


User Guide of Imivo Image Editor
The Online Image Editor is a comprehensive web-based tool developed for both novice and experienced users who want to edit images fast and efficiently. It allows you to make common image changes without installing any software. With this tool, you can crop photos, add simple annotations, remove backgrounds, compress large files, upscale images, and handle many other basic editing tasks.Moreover, the editor runs directly in your browser, making the process fast and convenient. Whether you are preparing images for social media, work, or personal projects, this tool helps you stay productive. In this user guide, you will discover how to use each feature step by step, what each tool does, and how to get the best results from your images.
Getting Started
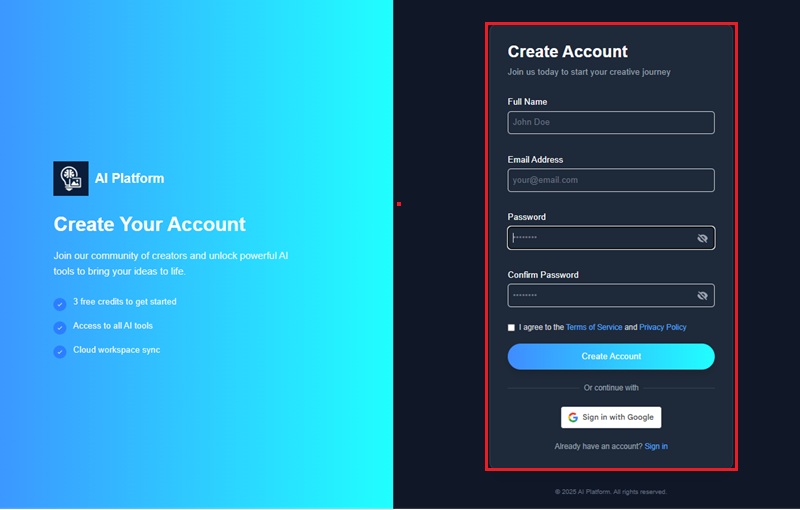
Step 1Create An Account
To start, you will need to register for a free account by visiting our AI Image Generator & Editor. Once you're on the platform, click the "Sign-Up" button to proceed. Then, input your name, email address, and a secure password to complete your registration. Once done, you will receive an email to verify your account. Just hit the link in your email to sign in.
Step 2Get More Credits (Optional)
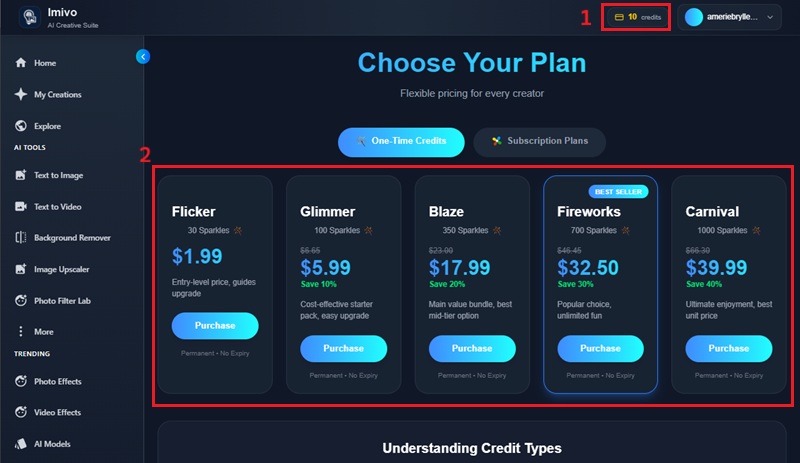
Our online image editor gives you 10 credits upon registration. These credits are essential for using advanced AI-powered features, such as background removal and image compression. If you need more of this, click the "Credits" and choose the plan of your choice. Now, you can use the image editor's diverse functionalities to enhance your images.
Credit Pricing for Our AI Tools:
- Text to Image: 3 Credits
- Text to Video: 25 Credits
- Background Remover: 3 Credits
- Object Eraser: 1 Credit
- Image Upscaler: 3 Credits
- Photo Effects: 1 Credit
- Video Effects: 2 Credits
- Photo Filters: 3 Credits
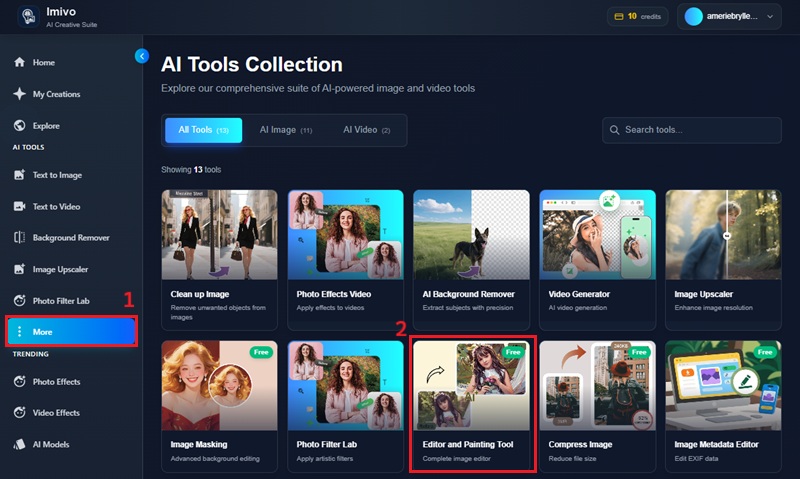
Step 3Access Image Editor
On the AI Image Generator & Editor's interface, click the "More" option located on the left panel of the tool. Then, multiple tools will emerge on the tool's interface. Here, click the "Editor and Painting Tool."
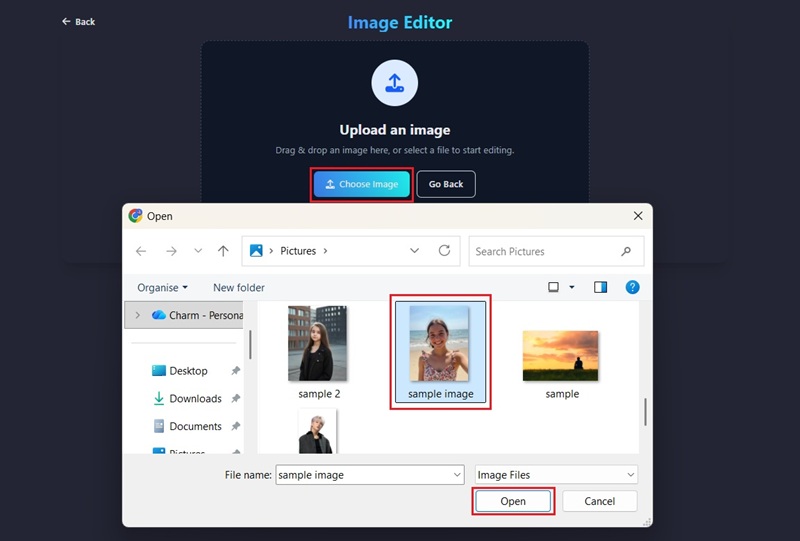
Step 4Upload Image
Once you click the "Editor and Painting Tool," the interface will transition to the upload page. From here, click the "Choose Image" to browse your files and pick the photo you want to edit. After selecting the image, click "Open" to upload it to the tool. Then, you can choose what kind of edits you can do for your image.
How to Use Basic Image Editing Tools to Polish Your Photos
Now you know how to upload an image on the platform, let's explore the basic image editing tools you can employ to enhance your image. You can choose which editing functions best suit your specific needs.
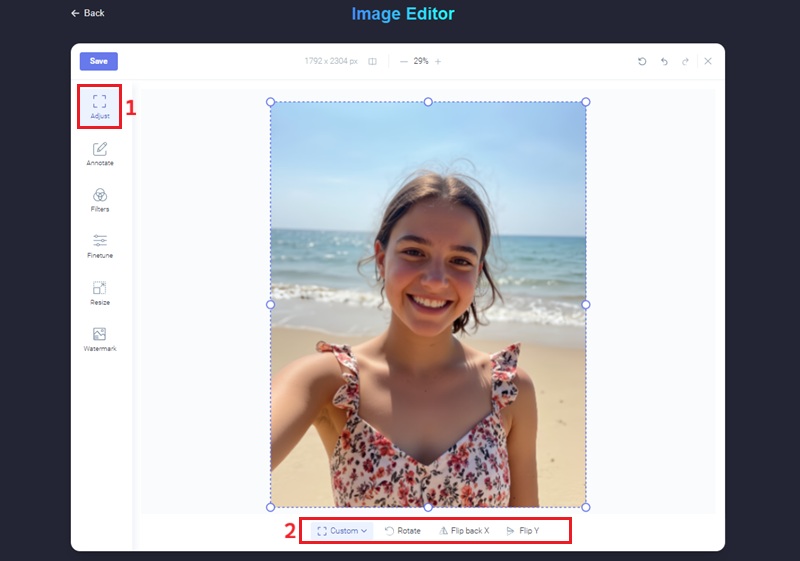
Crop, Rotate, and Flip Image
If you need to adjust the orientation of your image, these fundamental tools offer precise control over your image dimensions and position. It helps ensure your images are perfectly aligned and framed for optimal visual impact.
First, click the "Adjust" option, and you will see the "Crop, Rotate, and Flip" option. The crop tool, for instance, allows you to select a specific area or choose between landscape and portrait. Once you click the "Rotate" option, you can manually rotate the image. With the "Flip" option, you can flip the image horizontally or vertically. This helps you create a mirror effect or fix an unbalanced image layout.
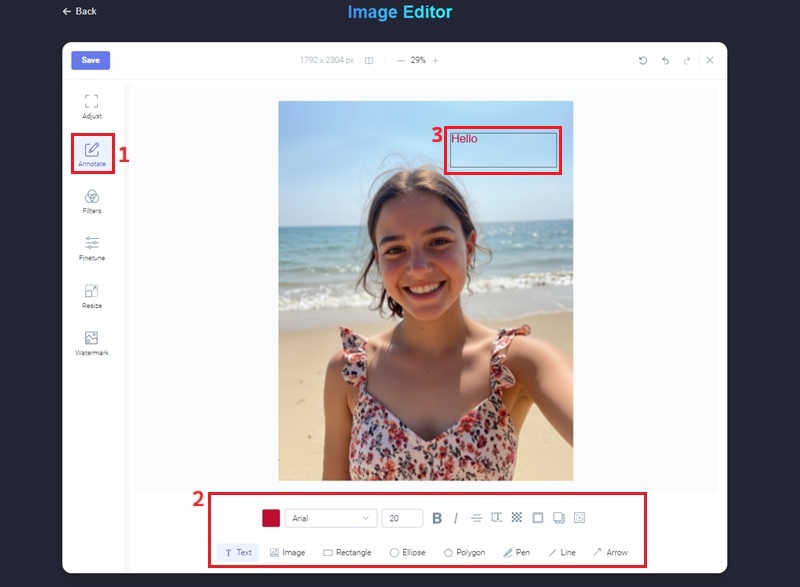
Annotate Image
Next, to enhance clarity or highlight specific elements on your images, you can utilize the annotation tools. With this tool, you can insert text, shapes, images, arrows, and even freehand drawings directly onto your uploaded image. You can also modify the opacity and color of these annotations to ensure they seamlessly integrate with your image.
To do this, click the "Annotate" button, then choose which annotation type you wish to apply, such as a text box for labels or a shape to emphasize a particular region. You can also click the image to add an overlay.
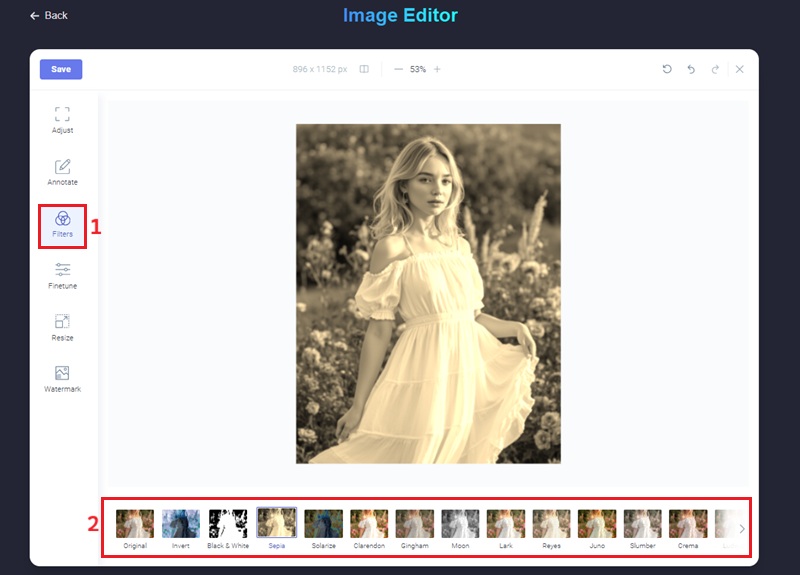
Apply Image Filters
Suppose you want to alter the aesthetic tone or visual appeal of your image. Applying a filter can be an effective method to achieve this. Our photo editor provides various preset filters, allowing users to quickly transform their images with effects like sepia, black & white, claredon, and more. This feature is practical for those who want to upload their photos to social media or other online platforms with a consistent visual style.
To apply a filter, simply navigate to the “Filters” section within the editing interface. From there, you can browse the available options and preview how each filter affects your image in real time. Once done, you can click the "Save" option.
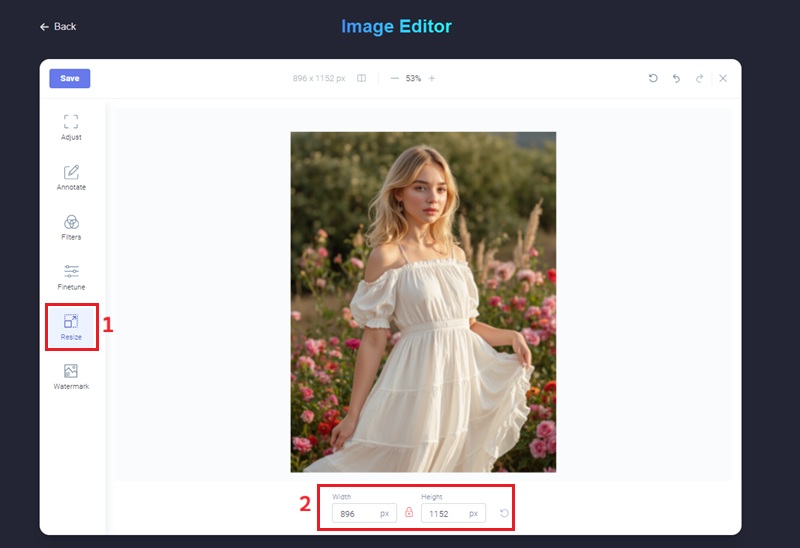
Resize Image
If your image file is too large or its dimensions are inappropriate for a specific application, the resize function lets you adjust its size. This is especially beneficial for optimizing images for web display, where you can consistently use the same image sizes.
To adjust your image size, click the "Resize" option on the editing panel. Afterward, enter the desired width and height in pixels to ensure the image fits your exact specifications.
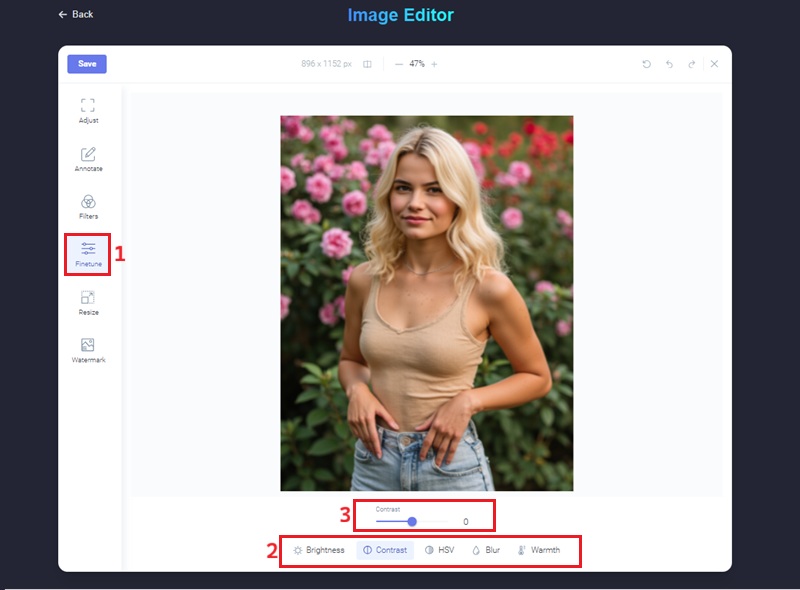
Adjust Color in Image
To fine-tune how your images look, the color adjustment tools let you easily control brightness, contrast, saturation, and hue. With these options, you can fix lighting issues, improve colors, and set the mood or style you want. In addition, you can adjust the blur level to create the right effect. For example, increasing contrast makes the difference between light and dark areas clearer, while changing saturation makes colors appear brighter or more muted.
To access these controls, navigate to the "Fine-Tune" panel. Then, choose the specific settings you want to adjust. You can choose from brightness, contrast, HSV, warmth, and blur. Then, you can adjust the slider or manually include the level in the designated box for each setting to achieve your desired visual outcome.
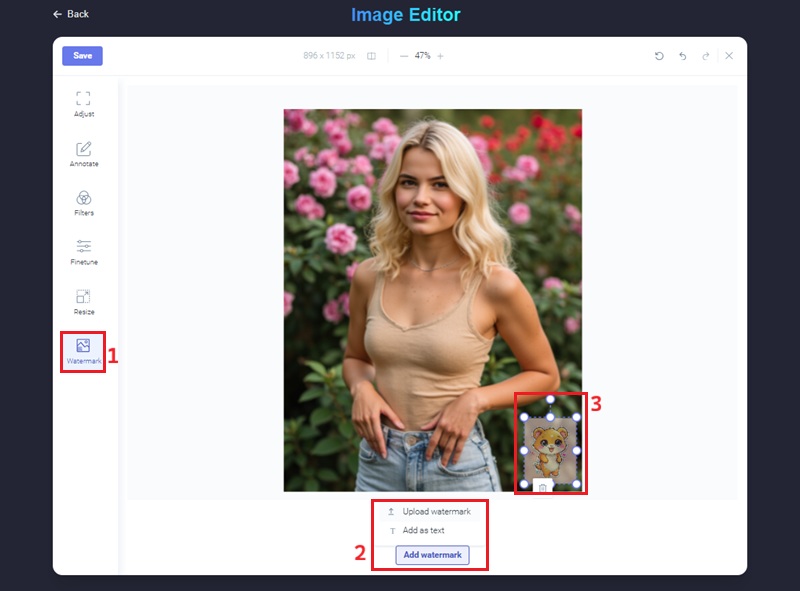
Add Watermark to Image
If you need to create an image with your work's branding, adding a watermark can serve as a protective measure. This is notably useful for photographers, artists, or businesses looking to secure their intellectual property and prevent unauthorized use of their digital content. Moreover, watermarks can also serve as a subtle branding tool, subtly reinforcing your identity with every shared image.
To start including a watermark on your image, click the "Watermark" option. After that, click the "Add Watermark" option under the image you have uploaded. Then, you can either use an image or input custom text as your watermark. You can further customize the watermark’s appearance by adjusting its opacity, size, position, and rotation. This helps it blend well with the image without covering important details.
Edit Image Metadata
Once you're done with your edits, you can also edit your image metadata. This functionality enables you to modify descriptive information, such as the name, author, date, comment, and more. Besides, you can add copyright information directly to the image file, which is crucial for intellectual property protection and content management. This feature is particularly beneficial for organizing digital assets, ensuring proper attribution, and optimizing images for searchability within digital libraries or online platforms. To edit your image metadata, see the guide below.
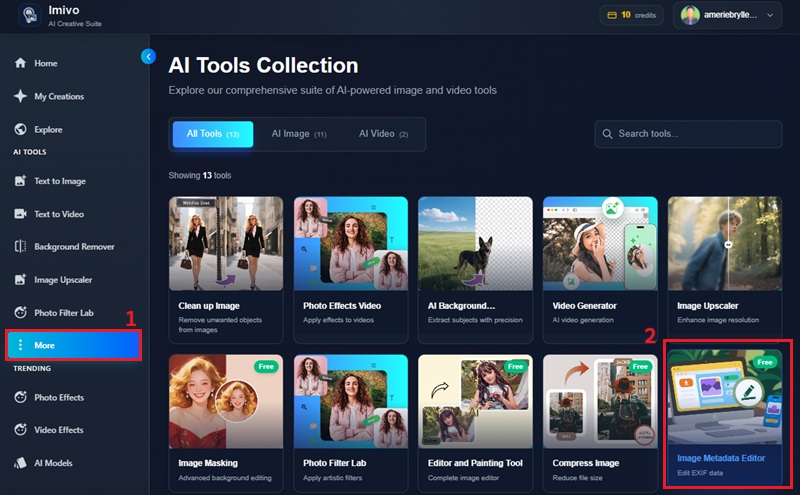
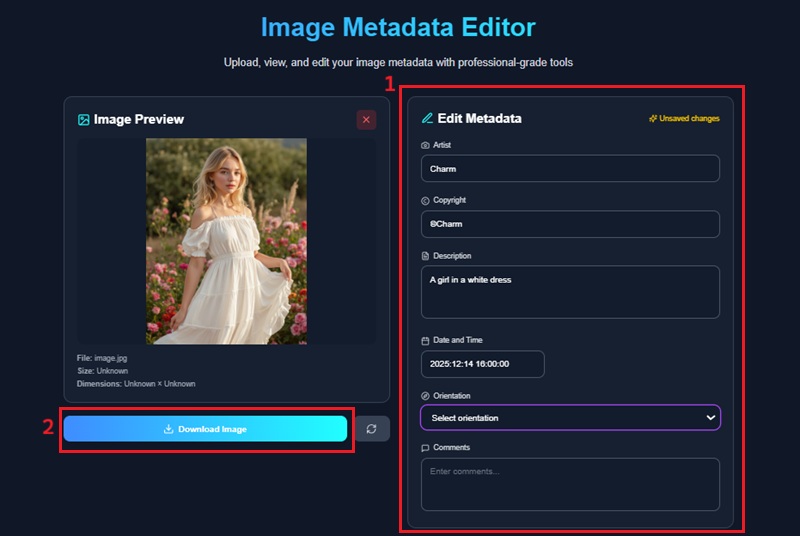
Step 1: Launch Metadata Editor
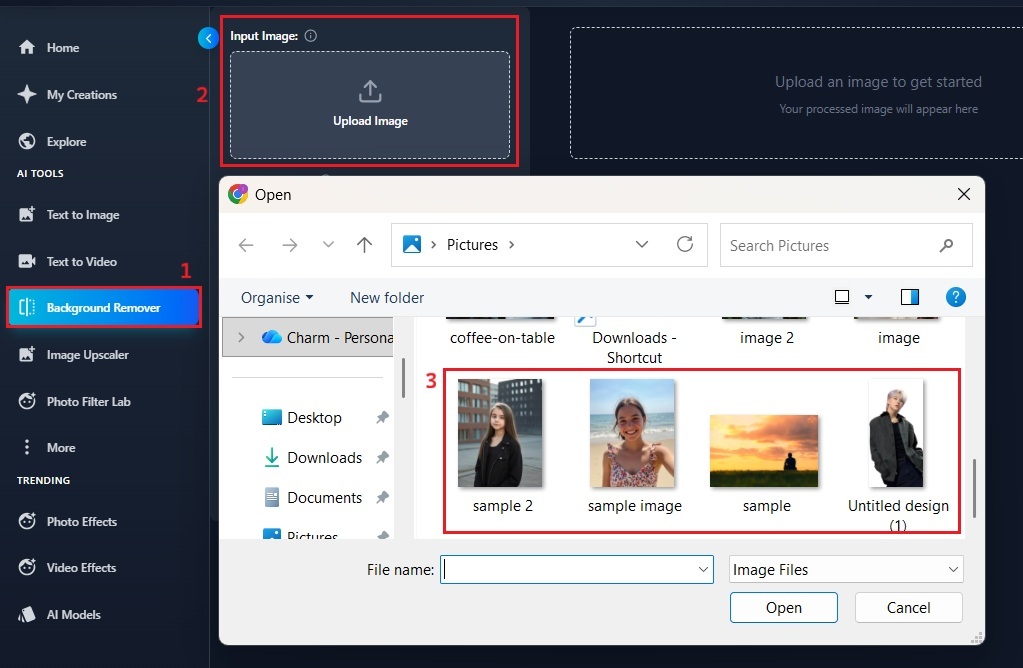
To begin, locate the "More" option on the tool's main interface. Clicking this will let you see the multiple tools you can use to edit images. From here, select and click the "Image Metadata Editor."
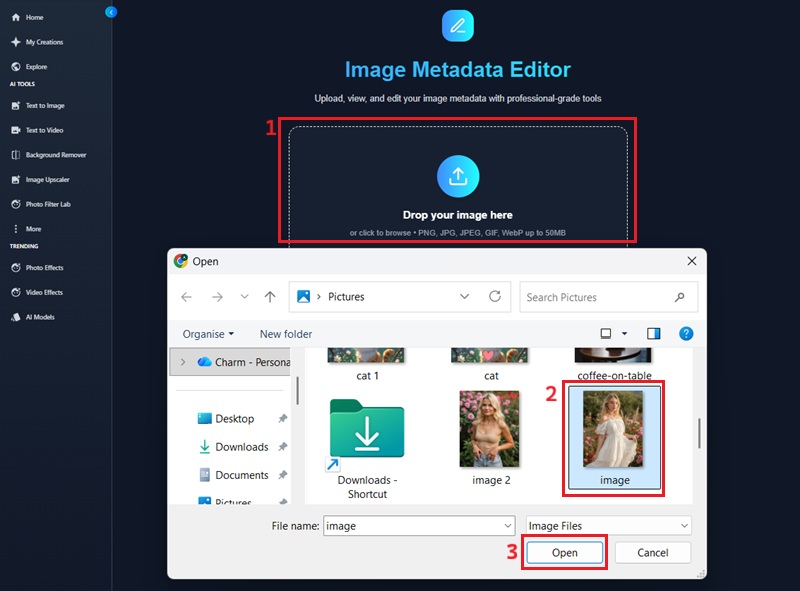
Step 2: Add an Image
After selecting the editor, you will be moved to the image metadata editing page. Here, click the "Drop your image here" and upload the image you wish to modify. Alternatively, you can drag and drop the photo.
Step 3: Edit and Save Metadata
Once the image is loaded, you will see the editable data, including title, author, and copyright information. Fill in all the information in the provided fields, ensuring accuracy and completeness. Once done, click the "Download Image" button to save your changes and download the image with its updated metadata.
How to Use AI-Powered Image Editing Solutions to Enhance Your Images
Our AI Image Generator & Editor offers advanced functionalities that leverage artificial intelligence to automate complex editing tasks and generate novel visual content. These advanced editing tools are designed to streamline your workflow, ensuring higher quality outputs with minimal manual effort. As you go through the tools, you will see how they work together to improve image quality and overall appearance. By the end, you will be ready to create clean, polished images with ease.
Remove Background from Images
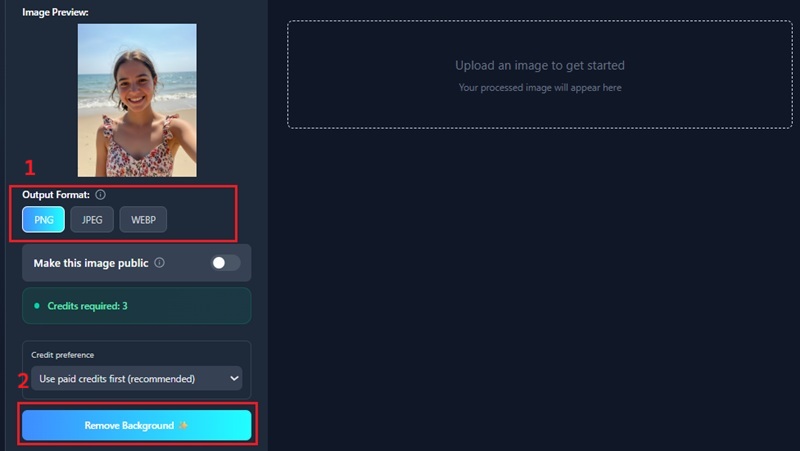
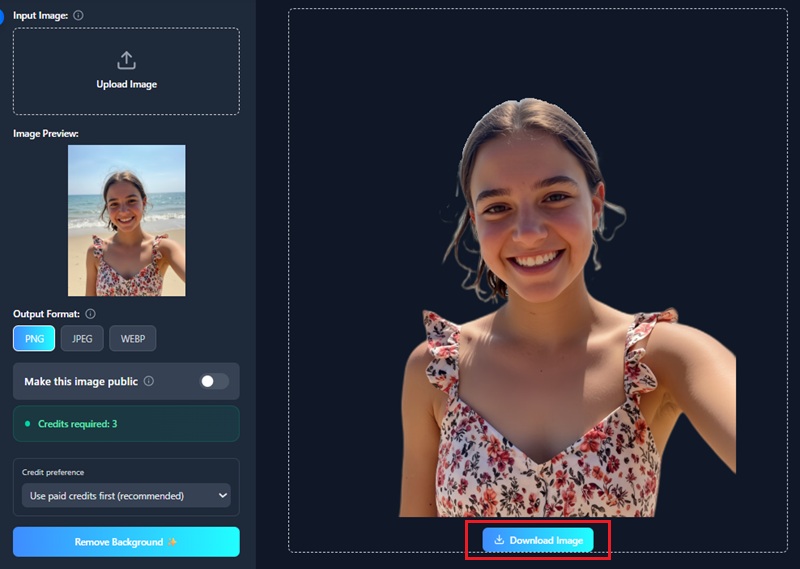
The object remover tool helps you quickly eliminate unwanted background from your image with just a few clicks. It is useful for product photos, profile pictures, marketing images, and social media posts. After editing, you can keep the image clean or ready for further use. You can download the final photo as a PNG to preserve transparency, or choose JPEG or WEBP for easier sharing and faster loading. This makes the tool suitable for both personal and professional projects.
Step 1: Import a Photo
Start by accessing the "Background Remover" tool from the main interface. Once activated, upload your desired image either by selecting it from your local files or by dragging and dropping it into the designated area. The tool will then prepare your image for editing.
Step 2: Remove Background
Once your image is loaded, select the output format you want. Then click the "Remove Background" button to automatically remove the background. The tool will process your image then.
Step 3: Download Image
After processing, your edited image will appear on the screen. You can preview it to make sure it looks right. Then hit the "Download Image" button to save the image with a transparent background.
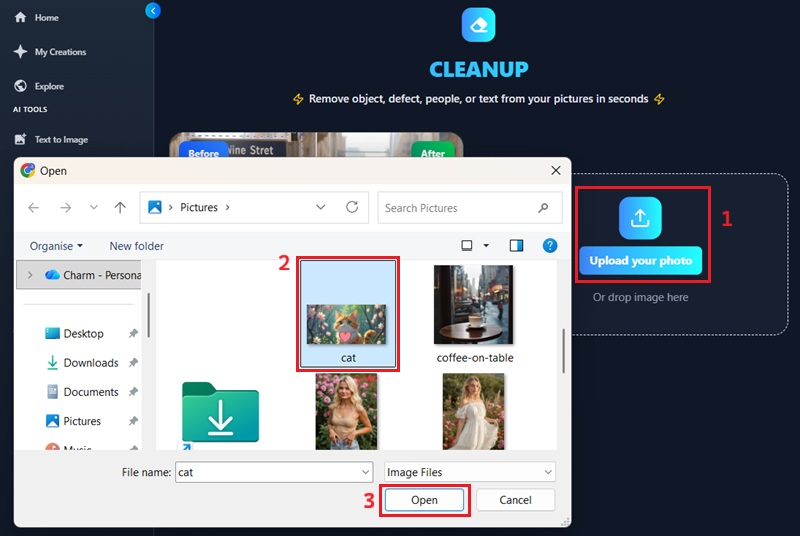
Remove Object from Images
Remove Object from Images lets you easily erase unwanted items from your photos without affecting the rest of the picture. You can remove stickers, dates, people, or any other distractions with just a few clicks. This tool is perfect for cleaning up product photos, travel shots, or social media images. It helps make your photos look more professional and draws attention to the main subject.
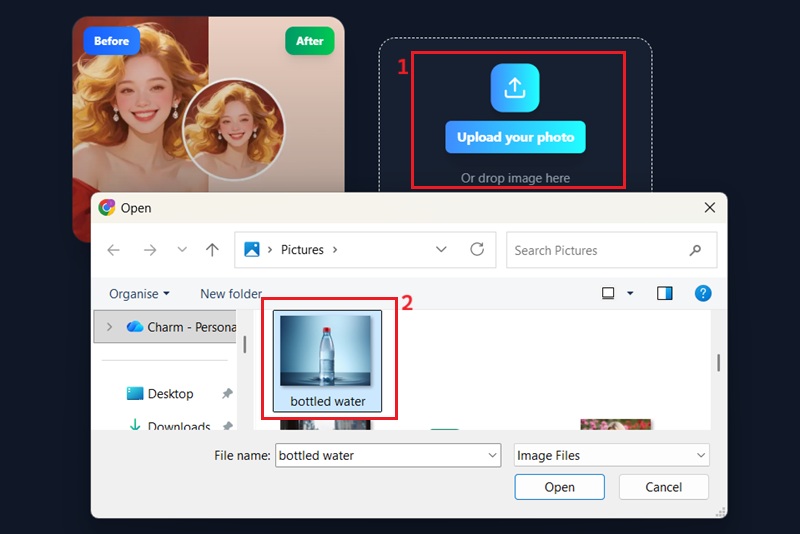
Step 1: Insert a Picture
Begin by locating the "Clean Up Image" by accessing the "More" option from the main interface. Next, click the "Upload your photo" and pick the image you want to edit. Once decided, click the "Open" option to open it in the editor.
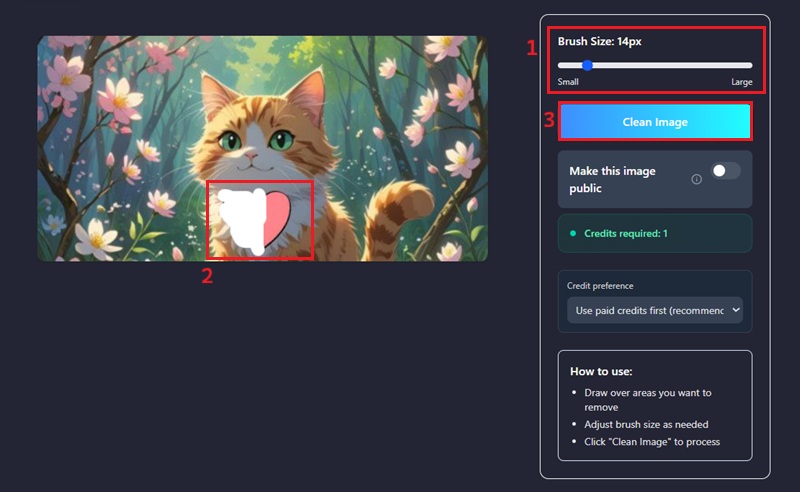
Step 2: Clean Up Image
After uploading the image, adjust the brush size to accurately select the unwanted object. Subsequently, paint over the unwanted object to ensure complete coverage. Then, click the "Clean Image" button to start the automatic removal process.
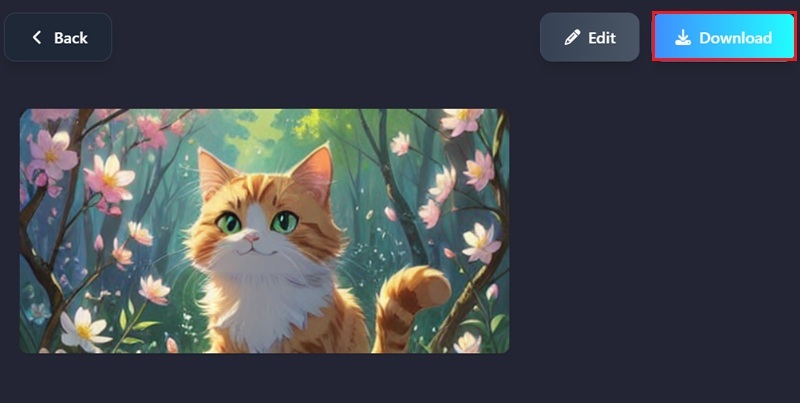
Step 3: Save Edited Image
Click the "Clean Image" button to let the tool process your photo. Once finished, the edited image will appear on the screen. Review it to make sure all unwanted elements are removed, then save your refined image.
How to Upscale Images
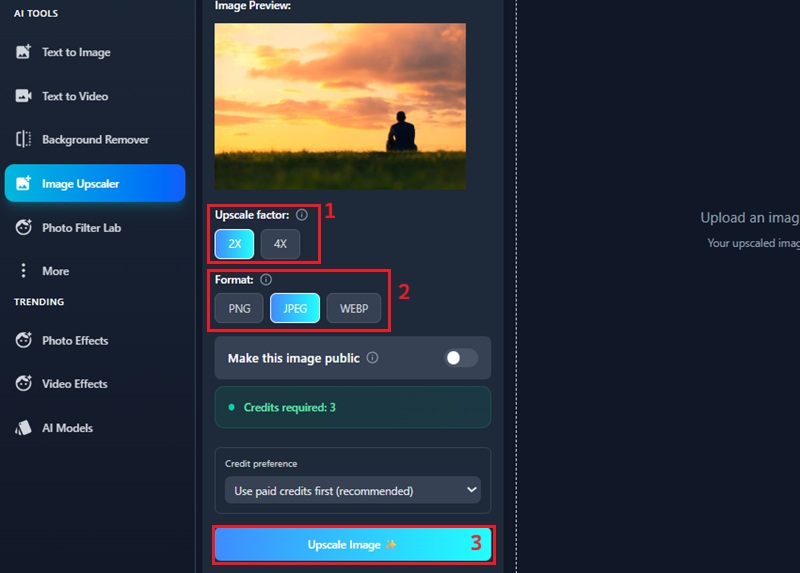
Do you need to enlarge your images significantly? Our powerful image upscaler is designed to effortlessly improve low-resolution files and restore vintage photos. It automatically refines details to ensure your visuals look crisp on even the largest high-definition screens. Besides, you can also enlarge your image by 2X or 4X to get a more detailed version. You can immediately make your content stand out with sharper graphics optimized for both physical printing and digital platforms, as well as specific presentations.
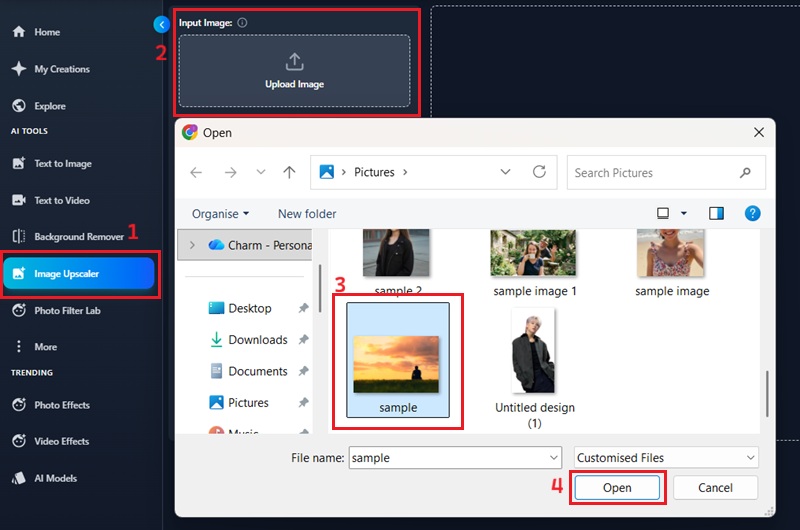
Step 1: Upload Your Photo
Access the Image Upscaler from the dashboard to start the process. Simply browse your computer for the low-resolution file you want to upscale. After highlighting the file, hit the "Open" button to import it into the workspace.
Step 2: Upscale Your Image
After your photo loads, choose the size you want. For instance, choosing 2X or 4X will significantly enhance the image resolution while preserving visual fidelity. Finally, choose your preferred file type and click "Upscale Image" to start upscaling.
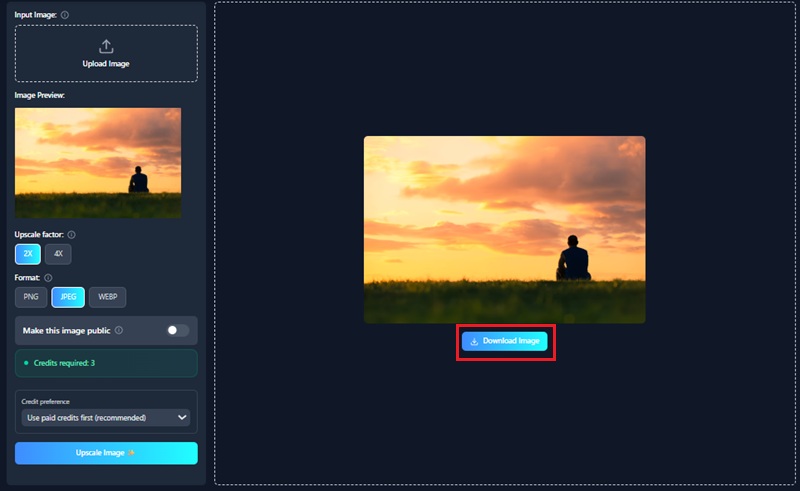
Step 3: Download Upscaled Image
Once the enhancement is complete, preview the final result to ensure it looks perfect. If you are happy with the clarity, simply click the "Download Image" button to keep the high-resolution image file on your device. Your picture is now ready to be shared on social media, used in a presentation, or printed in high quality.
How to Compress an Image
Another useful tool is the Image Compressor, which lets you make large files smaller without losing quality. It's great for freeing up space on your phone or computer so you can save more photos. It also helps if you need to upload pictures to social media or send them by email without size problems. This tool is an easy way to keep your photos looking good while making them easier to share. Furthermore, reducing file size can significantly improve website loading times, enhancing the user experience.
Step 1: Select Image
To initiate the process, launch the image compressor from the main dashboard. Next, either drop and drag the image of your choice or click the upload box to browse for it. After that, select the image file you wish to compress, and it will automatically load into the editor.

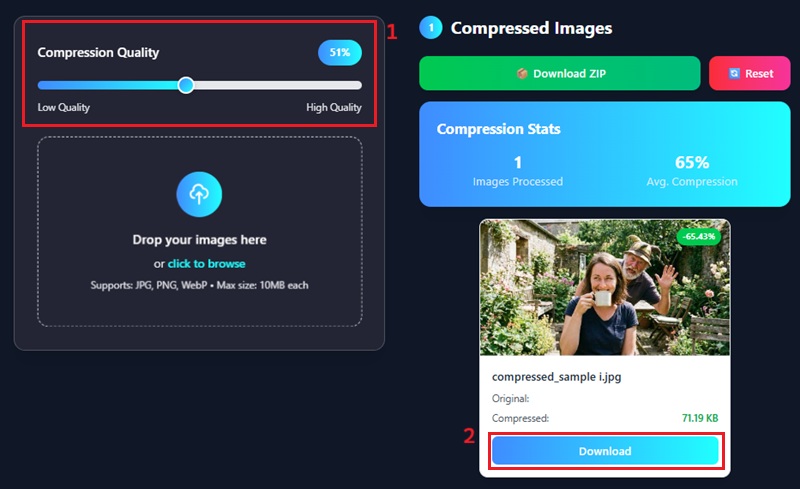
Step 2: Compress and Save Image
Once the image is loaded, specify your desired compression level by sliding the slider from 0 to 100%. While sliding the slider, you can see the real-time preview of the compressed image and the file size. Once you are happy with the balance of size and quality, just tap the "Download" icon to save the new version to your device.
How to Mask an Image
Lastly, you can use the Image Masking tool to remove messy backgrounds or cut out specific objects with better control. It is great for creating collages or cleaning up product photos for online stores. Instead of leaving empty space, you can fill the background with any solid color you like. To make your designs even more unique, you can choose from a variety of masking styles, including circles, squares, stars, and hearts. Giving you full control over the shape and the background color, it helps you create a professional look in just a few seconds.
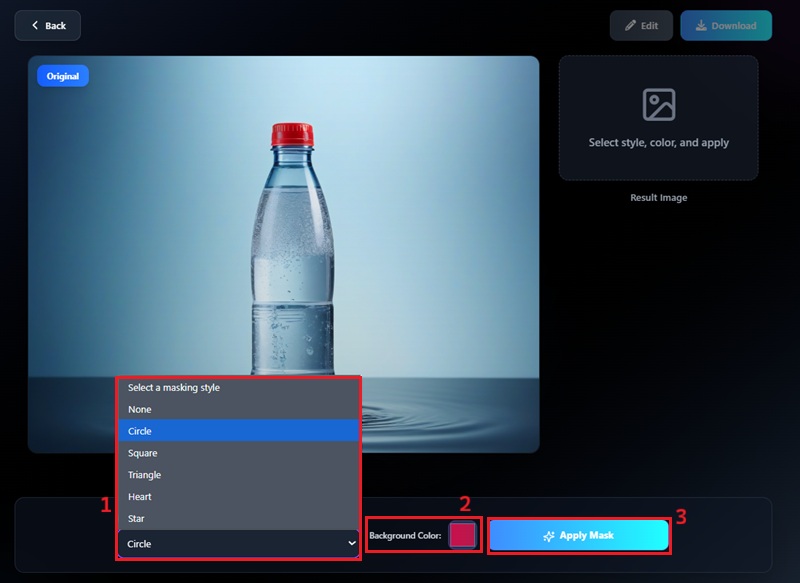
Step 1: Choose Image
Navigate to the dashboard and select the "Mask Image" tool from the menu. Next, you can either drag and drop your photo directly into the workspace or click the "Upload Image" button to browse your folders. Once you select the image file, the tool will quickly load it so you can begin editing immediately.
Step 2: Apply Mask
Upon successful upload, you can select the desired masking style and choose from shapes such as circular, rectangular, and others. After that, choose your preferred background color from the provided palette. Lastly, click the "Apply Mask" to process the image.
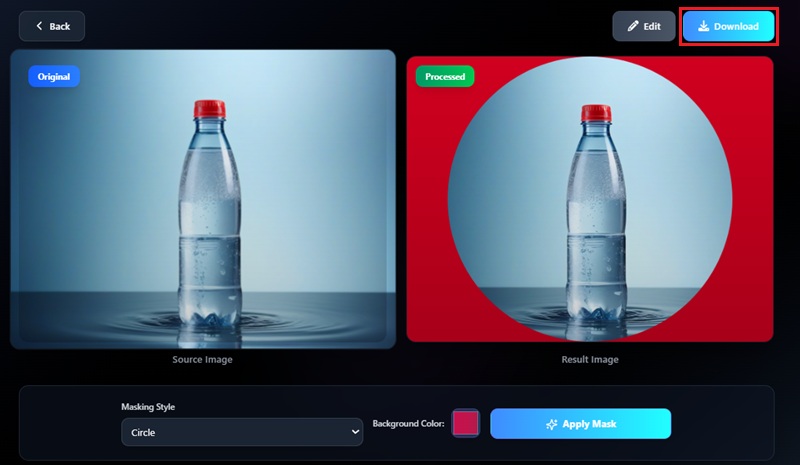
Step 3: Download Masked Image
Once the masking is complete, a preview of your image with the new background will appear next to the original. If you want to further edit your picture, you can click the "Edit" option. But if you're satisfied with the result, simply click the "Download" button to save the masked image to your device.
FAQs
What tools can I use for free?
Our online image editor provides a suite of features for free. All the basic editing tools are free, as are some advanced features, like image masking, an image compressor, and a metadata editor. The other advanced tool requires credits; no need to worry, as you can test the tools with the free credits for all new users.
Why is it important to use an online editor?
An online editor makes image editing quick and easy without installing any software. You can edit your images anytime and on any device with internet access. It saves time by providing ready-to-use tools for common image tasks such as resizing, cropping, and enhancing. Besides, online editors are also beginner-friendly, so you don’t need advanced editing skills.
Is the image editor secure?
Yes, our service is designed with robust security measures to protect your data and privacy. All your images can be stored according to your preferences. You can delete them after you download them, or let them stay on the platform for 30 days. We use end-to-end encryption for all uploaded and processed files, ensuring that only you can access your visual content, unless you make them public.