 Screen recording with audio lets you easily capture everything happening on your computer, including sound, in real time. People use it for many reasons, like making tutorials, recording games, sharing presentations, or saving video calls. Whether you want to teach something or just keep a memory, screen recording helps you share your ideas clearly. Adding audio, such as your voice or system sounds, makes your recordings more helpful and easier to follow. This is especially important for guides, online classes, or walkthroughs that require explanations. On Windows 11, you have several options for recording your screen with audio. You can use built-in tools, free software with extra features, or third-party apps for more control and better quality. In this article, we’ll look at different tools and explain how to screen record on Windows 11 with audio, step by step.
Method 1. Capture Screen and Audio PC Using Xbox Game Bar
When you want to record your screen without additional software, the Xbox Game Bar is one of the easiest tools to use. It is already built into your PC, so there is no need to install anything. This tool lets you capture your screen and audio, including system sounds and microphone audio. Besides, it has an audio control panel, so you can alter the volume of system audio, apps, and the mic separately. Additionally, you can track your performance in real time, including FPS (frames per second), CPU, GPU, and RAM usage. However, the Xbox Game Bar primarily works with games, meaning it cannot record apps or the desktop. Despite that, the Xbox Game Bar is still a convenient option for quick, simple recordings.
Step 1 Launch Xbox Game Bar
There are two ways to open the Xbox Game Bar on your Windows 11 PC. First, press Windows + G on your keyboard to launch it instantly. Second, you can search for “Xbox Game Bar” in the Start menu and click to open it. Once opened, you will see different widgets for recording, audio, and performance.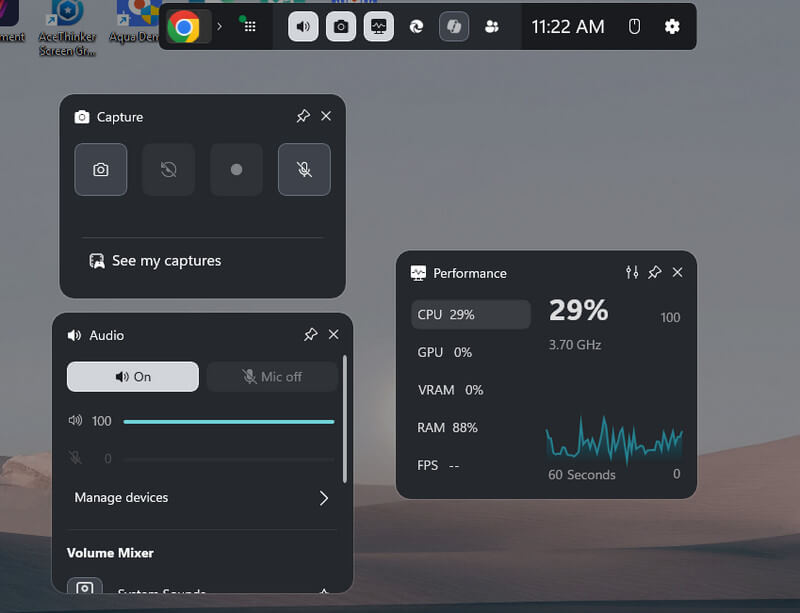
Step 2 Set Up Audio Settings
Before you start recording, check your audio settings to ensure sound is enabled. Go to the “Audio” widget and choose the correct microphone and system sound levels. You can adjust volume for apps and background sounds as needed.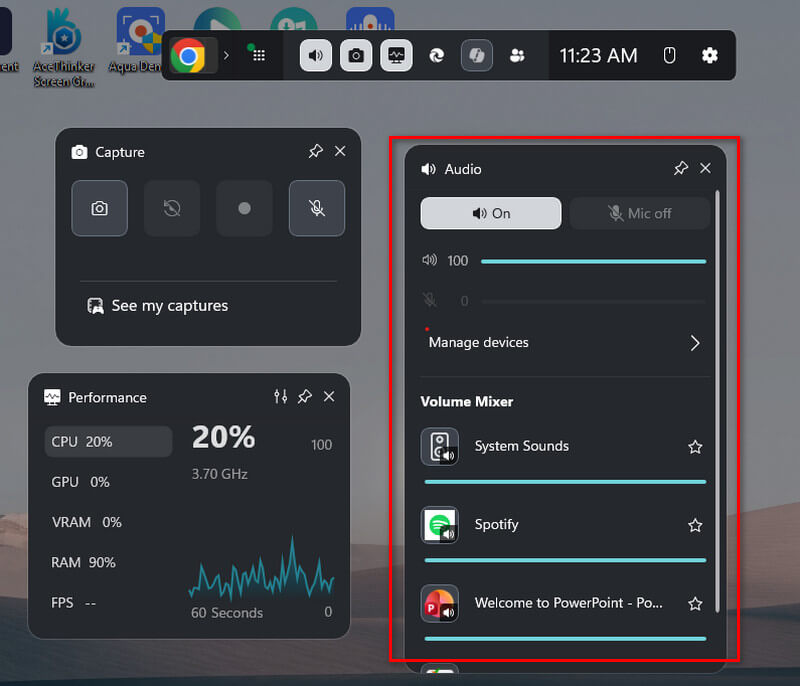
Step 3 Start Screen Recording
Once all set, click the “Record” button in the Capture widget to start recording. The tool will start recording your whole screen. When you are done, click the “Stop” button or use the shortcut to end recording. Finally, select the “See my Capture” option to preview your recordings.
Method 2. Use Microsoft Powerpoint Built-in Recording Feature
Microsoft PowerPoint is known for creating document slides for presentations. But apart from that, this tool also comes with a screen recording feature. This tool lets you record a selected area of your screen directly in PowerPoint, making it useful for creating tutorials, demos, or presentation guides. Also, you can record your full presentation with slide timings and animations. In addition, you can add voice narration using your microphone for each slide as well. Furthermore, if you want to record yourself while presenting a PowerPoint , you can also add a webcam overlay. It also lets you include mouse movements, which helps make your recordings clearer and easier to follow. However, it only works best for short clips, not extended recordings like full tutorials or meetings. Below is a guide to record screen with sound Windows 11 using Microsoft PowerPoint.
Step 1 Open Microsoft PowerPoint
Start by opening Microsoft PowerPoint on your Windows 11 PC. Then, select one of the sample PowerPoint presentations or open your own presentation. With that, you can access its recording feature. After that, attach your microphone for voice narration.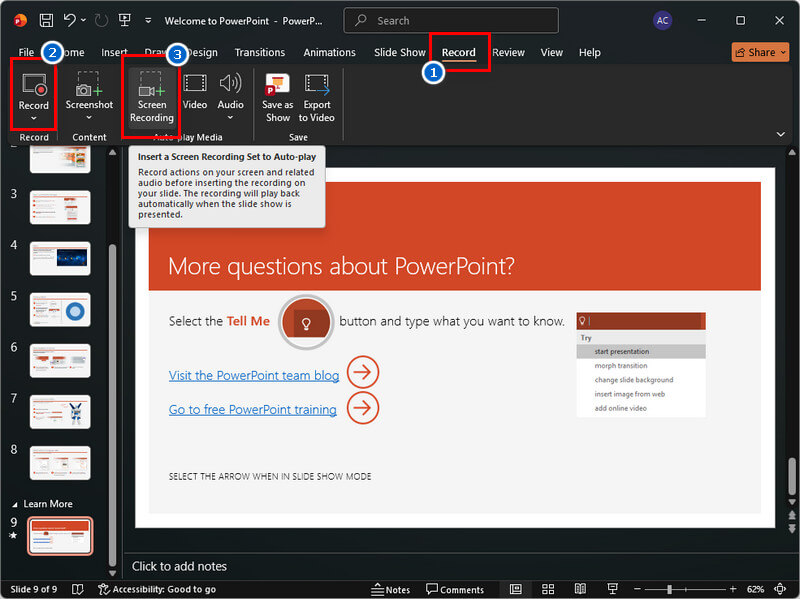
Step 2 Start Recording
Go to the “Record” tab and choose the recording option. Click the “Record” option if you are recording your presentation with narration. Or, select the “Screen Recording” option, set the recording area, and the tool will start recording.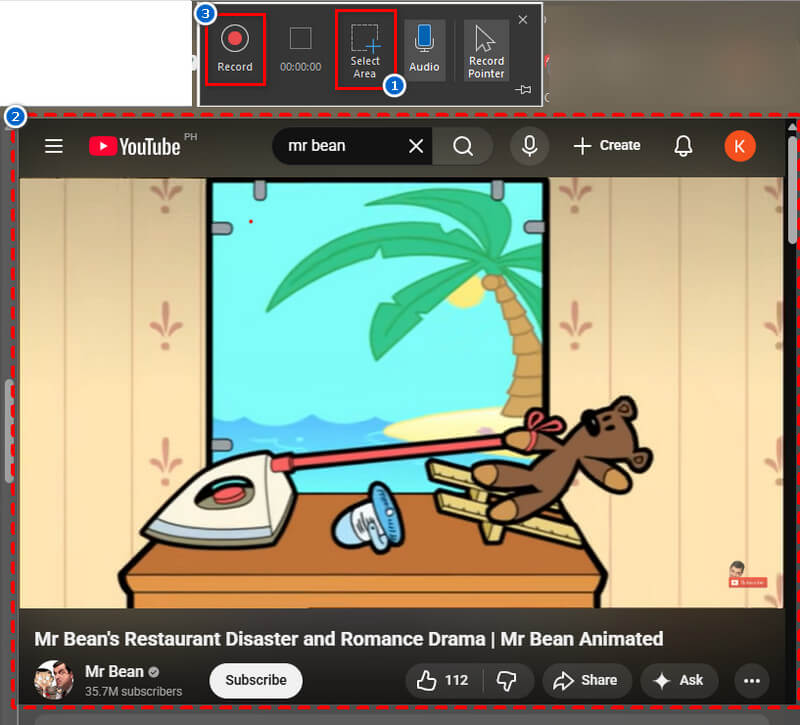
Step 3 Preview the Recording
To end the recording, click the Stop button or press the “Win+Shift+Q” keys. Then, the recorded video will be inserted directly into your slide. Finally, preview the recorded screen with audio to check both video and audio quality.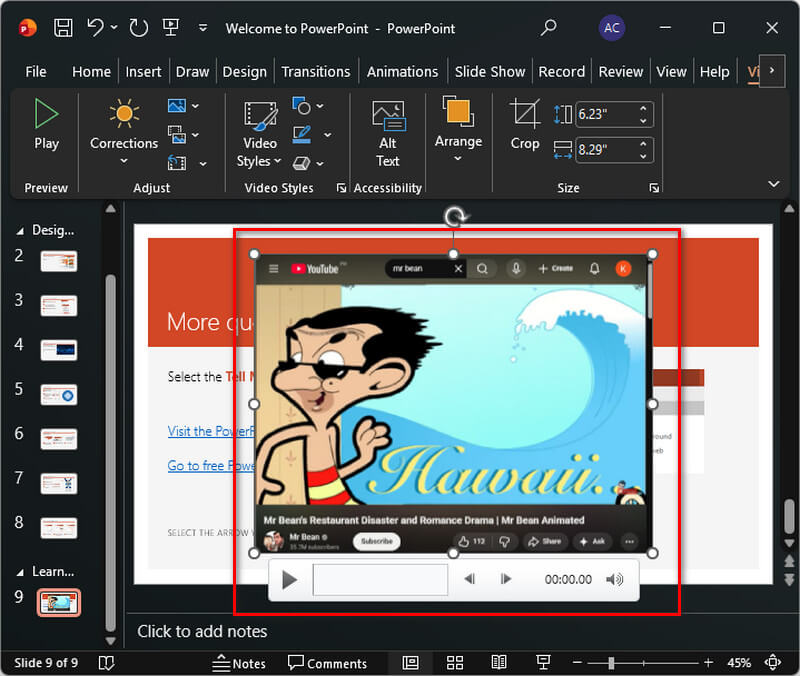
Method 3. Record Screen and Microphone on Windows 11 With OBS Studio
If you prefer a free but advanced recording software, go for OBS Studio. The tool is an open-source screen recorder with powerful recording and live-streaming features. It lets you capture your entire screen, specific windows, or custom areas with high-quality output. You can record at 4K resolution with frame rates up to 120. Additionally, OBS Studio supports recording both system audio and microphone audio simultaneously with separate controls. This means that you can adjust volume levels, mute sources, and manage audio inputs in real time. You can also add multiple sources, such as webcam overlays, images, and text, using customizable scenes for a more dynamic, professional look. However, the tool is quietly difficult to use and not suitable for beginners. Because its interface is quite confusing, and the tool requires manual setup. Still, OBS is the best tool to record long sessions like tutorials, meetings, or gameplay without restrictions.
Step 1 Download and Install OBS Studio
To use OBS Studio as a screen recorder with audio Windows 11, first download it from the official website and install it on your PC. Follow the installation guide and open the software once it’s ready. The tool will then open automatically after installation and guide you through an auto-configuration for recording or streaming.
Step 2 Set Up Screen and Audio Sources
Next, add the sources you want to record. Simply click the + button in the “Sources” panel and choose “Display Capture” to record your PC screen. Then, add Audio Input Capture for your microphone and Audio Output Capture for system sounds.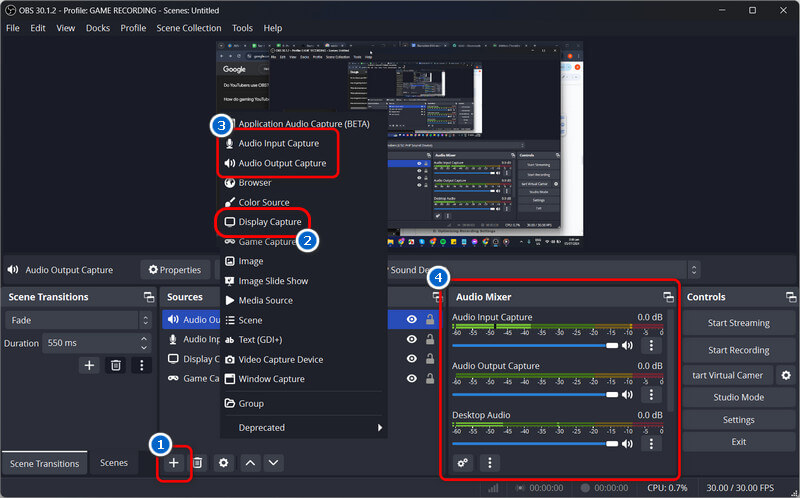
Step 3 Start and Stop Recording
Once your sources are ready, click “Start Recording” to begin capturing your screen with audio. When done, click “Stop Recording,” and your video will save in the folder set in Settings. Lastly, locate the recorded screen with audio and preview it.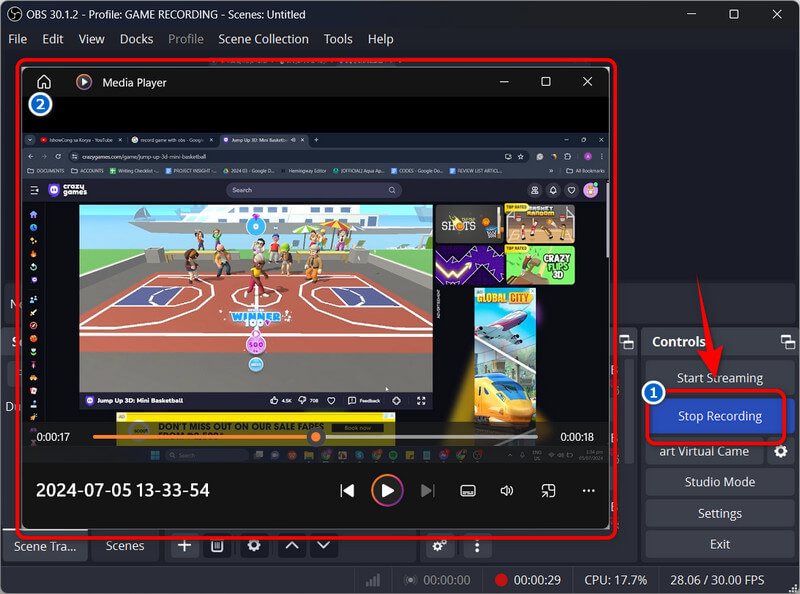
Method 4. Record Screen with Audio Using Aqua Demo
For those who want a screen recorder perfect for creating tutorials or other recording activities, you can go with Aqua Demo . This software includes useful features that let you easily do Windows 11 screen recording with audio. It allows you to capture the screen in your preferred ratio, whether full-screen, a specific region, or a selected window. In addition, the tool supports recording system sound or microphone audio, or both, making it perfect for narration and background audio. Furthermore, you can make real-time annotations like drawing, highlighting, and adding text or shapes while recording, which makes tutorials and demos easier to understand. Not only that, but you can also add your webcam if you want to see yourself in the video as well. However, Aqua Demo is not totally free, meaning other features are only available in the pro version.
Step 1 Get Aqua Demo
Visit the official Aqua Demo website to download the tool's installer. Or, you can use the download buttons given below to get the file. After that, proceed to the installation process and follow the on-screen guide. Once installed, the tool will open automatically.Try it for Free
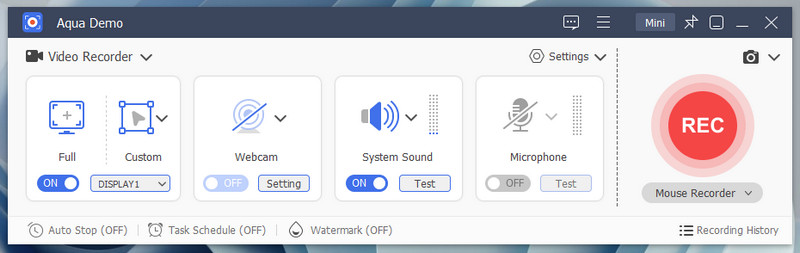
Step 2 Set Up the Recorder
On the main interface, turn on the System Audio option for recording computer sound. If needed, link your microphone and webcam to your PC and enable them with the tool. After that, set the aspect ratio you prefer, whether browser window, specific region, or full screen, depending on the activity.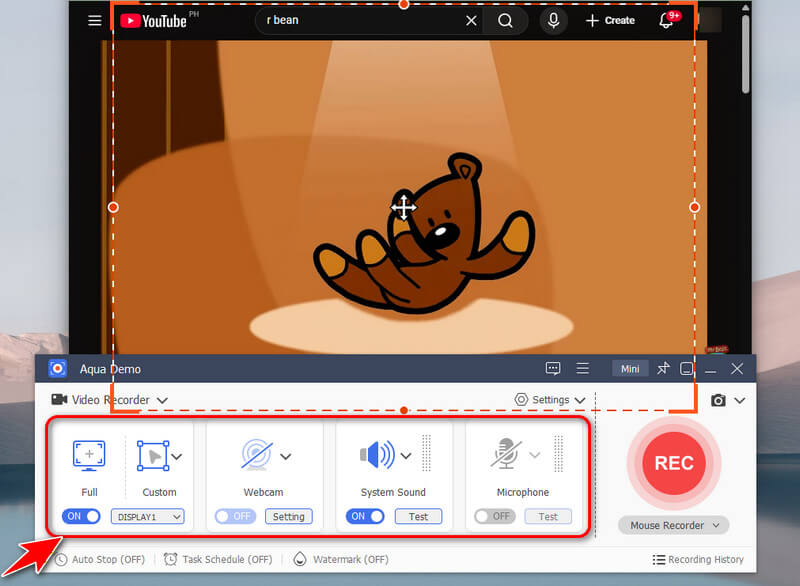
Step 3 Start and Stop Recording
When ready, click the big red record button, and the recording will begin after 3 seconds. If you’re recording to make tutorials, you can use the annotation tools by clicking the pencil icon. Once done, click the stop icon in the toolbar.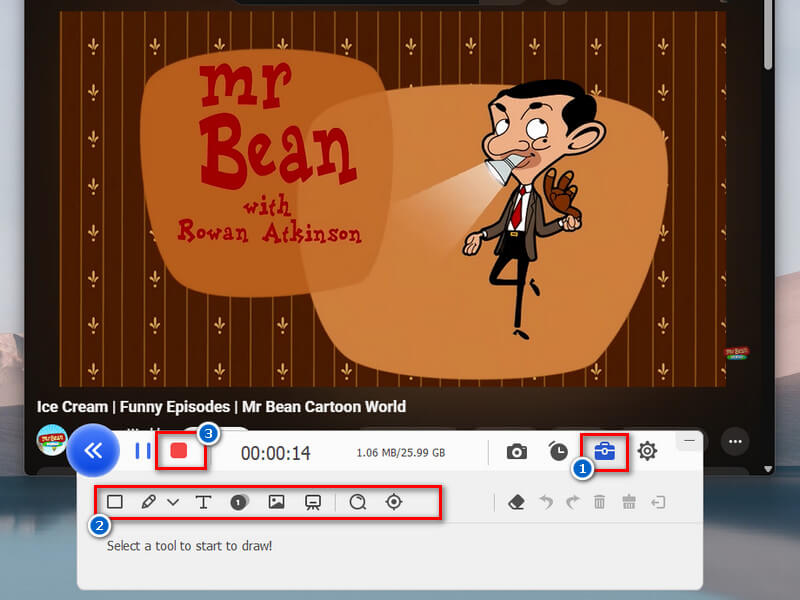
Step 4 Preview Recorded Activity
After that, preview your recording in the new tab. You can also trim the unnecessary part if you want to. Finally, exit the recorder after playback, since the tool will automatically save it to your set folder in the Settings.
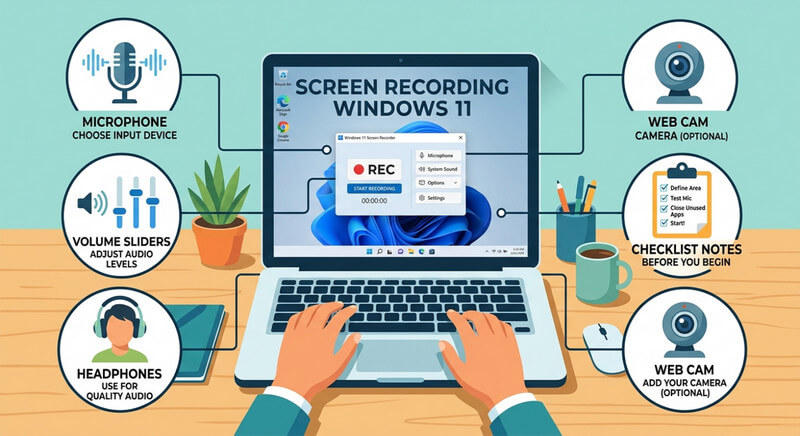
Some Tips for Screen Recording with Audio on Windows 11
Recording your screen with audio on Windows 11 is simple, but a few tips can make your videos clearer and more professional. Whether you’re making tutorials, presentations, or gameplay videos, following these tips ensures your recordings look and sound their best.
- Check your audio levels before you start recording. Make sure your microphone and system sounds are clear so you avoid audio that is too loud or too quiet.
- Close any apps you don’t need. This helps prevent distractions, pop-ups, or background noise, so your recording stays clean and focused.
- Choose your frame rate and resolution based on your computer’s power and your needs. Higher frame rates make videos smoother, but use more resources.
- Use headphones to avoid echo: If you’re recording internal audio along with your microphone, headphones prevent sound from looping back into the mic.
- Always save a backup of important recordings in another folder or on a different drive. This way, you won’t lose your work if something goes wrong.
- Pick the best screen recorder for Windows 11 with audio: Use a reliable tool that captures both video and audio smoothly. A good recorder ensures high-quality output and fewer technical issues.
Conclusion
There are many ways on how to screen record on Windows 11 with audio. You can utilize built-in tools like Xbox Game Bar for quick recordings or Microsoft PowerPoint for simple captures. If you want more control and higher quality, advanced software like OBS Studio and Aqua Demo are good options. Each option has its strengths and limitations, so it’s important to choose based on your skill level, recording purpose, and budget. If you’re a beginner, go with built-in tools for simplicity, while experienced users may choose OBS or Aqua Demo for full customization. With the right setup, you can create clear, professional recordings of both video and audio.
| Tools | Recording Quality | Output Format | Additional Features |
|---|---|---|---|
| Xbox Game Bar | Up to 4K resolution | MP4 | Instant replay recording, chat integration, screenshot capture |
| Microsoft PowerPoint Recorder | 1080p to 4K | MP4 | Presenter view support, screenshot capture |
| OBS Studio | Up to 4K quality | MP4, MKV, FLV | Custom browser docks, advanced masking & filters, audio enhancement |
| Aqua Demo | Up to 4K resolution | MP4, MOV, FLV, WMV, MKV, GIF, etc. | Schedule recording, screenshot capture |