 The PlayStation 4 is still one of the most popular gaming consoles, with millions of players enjoying games every day. From casual players to competitive gamers, many people want to capture their gameplay moments—whether it’s a big win, a funny glitch, or a full walkthrough. Recording gameplay makes it easy to share clips with friends, upload content online, or save memories from your favorite games. If you’re new to this, don’t worry. There are simple ways to record PS4 gameplay without needing advanced skills. In this guide, you’ll learn how to use the PS4’s built-in recording features to capture both past and current gameplay. We’ll also cover how to record using a capture card if you want more control and better quality. By the end, you’ll know the easiest ways to start recording your gameplay.
Capture PS4 Gameplay Using Its Built-in Recorder
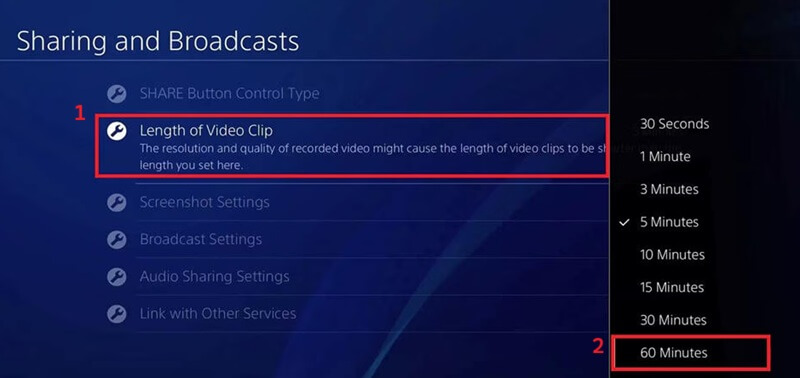
PS4, or PlayStation 4, is a video game console that lets you play video games on your TV with a controller. You can also watch movies, stream shows, browse the internet, and connect with other players online. In addition, PS4 has a built-in recording feature that you can use to record your PS4 gameplay. It lets you choose how long you want to record your gameplay in the background, from 30 seconds to 60 minutes. Besides, the gaming console lets you adjust the resolution and frame rate, such as 720p or 1080p, depending on your model. Furthermore, you can include your voice in recordings with a headset or microphone, making it perfect for creating content for streaming platforms. Moreover, PS4 can record past and current gameplay, so you won’t miss important moments while playing. See the provided guide below on how to capture PS4 gameplay.
How to Record Past Gameplay:
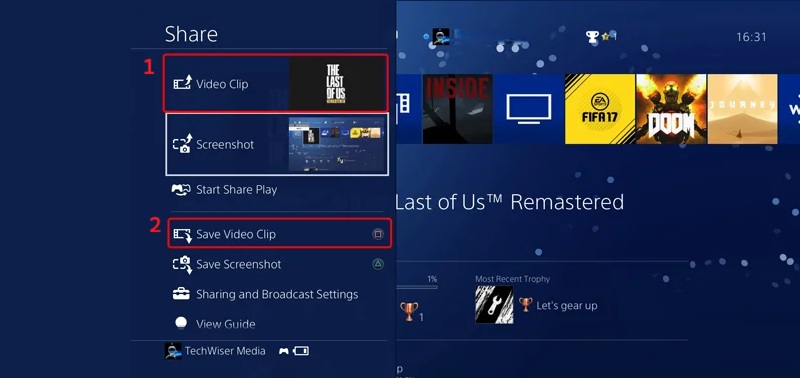
- First, press the “Share” button on your PS4 controller while playing. Then, the sharing menu will open on your screen, where you can see that the recent gameplay is already saved in the background.
- Next, choose the “Save Video Clip” option from the menu. The PS4 will save the last recorded gameplay for the duration you set. Wait a few seconds for the system to process and store the clip.
- After that, go to “Capture Gallery” to view your saved video. From there, you can trim the clip or make small edits if needed. Lastly, share the video on platforms like YouTube or copy it to a USB drive.
Record Current Gameplay Guide:
- Press the Share button twice on your PS4 controller to start recording. You will see a small notification that recording has begun. At this moment, everything on your screen will be captured.
- Next, start playing as usual while the PS4 is recording in the background. You can include your voice if you have a headset or microphone connected. Make sure your recording settings are adjusted beforehand if needed.
- When you’re done, press the Share button twice again to stop recording. The video will be saved automatically to the Capture Gallery. You can open it later to view, edit, or share your gameplay clip.
Record PS4 Gameplay With a Capture Card
While the PS4’s built-in features offer convenience, they often come with limits in video quality, recording time, and editing options. If you want a more stable and high-quality result, using a capture card is a better choice. This method works well for recording longer gameplay sessions and even lets you record Superbox content with smoother performance and clearer output. A capture card is a dedicated hardware device that captures video signals from your console and transmits them to your computer. Here are the steps on how you can connect your capture card to your PS4 and computer.
Step 1 Connect the PS4 to the Capture Card
Begin by connecting an HDMI cable from the PS4’s HDMI out port to the capture card’s HDMI in port. This establishes the video signal pathway from the console to the capture hardware.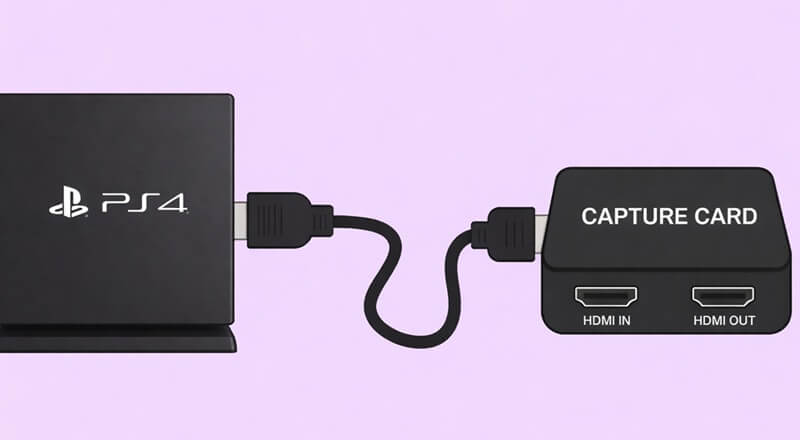
Step 2 Link the Capture Card to Your PC
Subsequently, connect the capture card to your personal computer via a USB cable. Once the capture card is plugged in, your computer will recognize it as a video input device. After that, launch your capture software on your computer to start capturing the PS4 gameplay feed.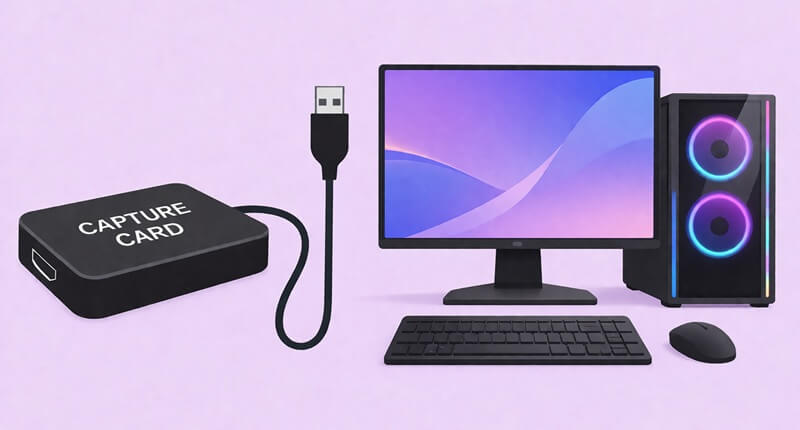
Best Way to Record Gameplay on PS4 with a Professional Screen Recorder
Once you have connected the capture card and the computer, you will need a flexible screen recorder to fully leverage the capture card’s capabilities for high-fidelity recording. In that line, Aqua Demo emerges as a robust solution. It offers advanced features for capturing your gameplay on your computer screen. It enables you to capture your screen and webcam simultaneously, offering complete options for content creation.
Moreover, you can record the system sound and your microphone, ensuring complete audio integration for your gameplay videos. Besides, you can also record Discord audio if you are communicating with teammates during gameplay. Apart from that, you can save your recorded gameplay in various formats, such as MP4, WMV, AVI, and more. This versatility ensures compatibility with different editing software and platforms for post-production and sharing. Below is a simple guide to record PS4 gameplay with a capture card and a screen recorder.
Step 1 Install PS4 Recorder
First, download and install the Aqua Demo software onto your computer. You can do this by clicking on any of the download buttons above. Once the game recorder is installed, it will automatically launch, presenting you with its user-friendly interface.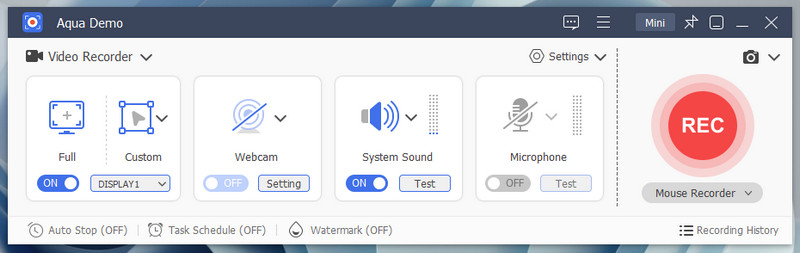
Step 2 Adjust Recording Settings
On the screen recorder interface, navigate to the "Settings" and click it. Then, choose the "Output Settings" option from the dropdown menu. Here, you can configure the video format, codec, frame rate, quality, and more options for your recording.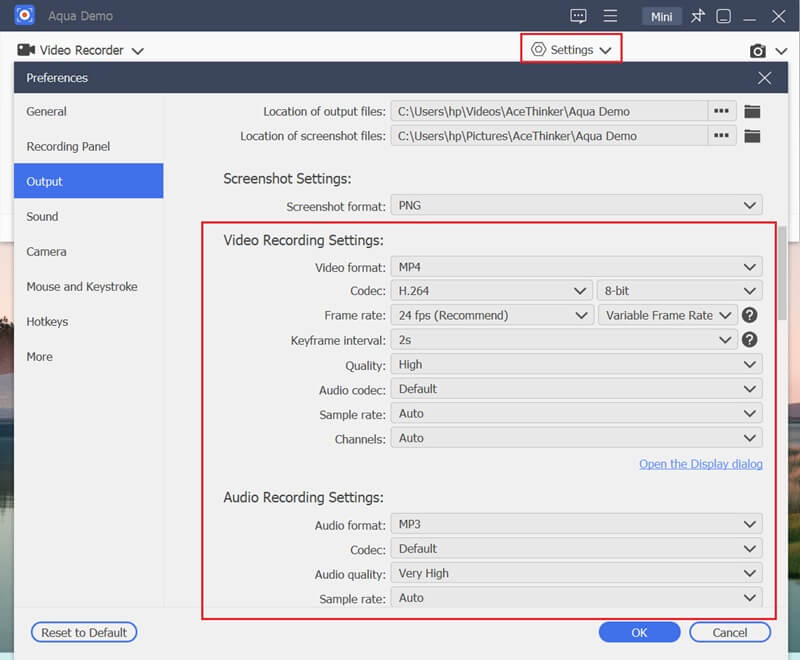
Step 3 Start Recording PS4 Gameplay
With your capture card properly connected and Aqua Demo configured, initiate the gameplay. Then, select the "Full" option to record in full-screen mode. After that, make sure that your system sound and microphone are activated to capture all audio sources. Finally, hit the "Record" option to commence the recording process.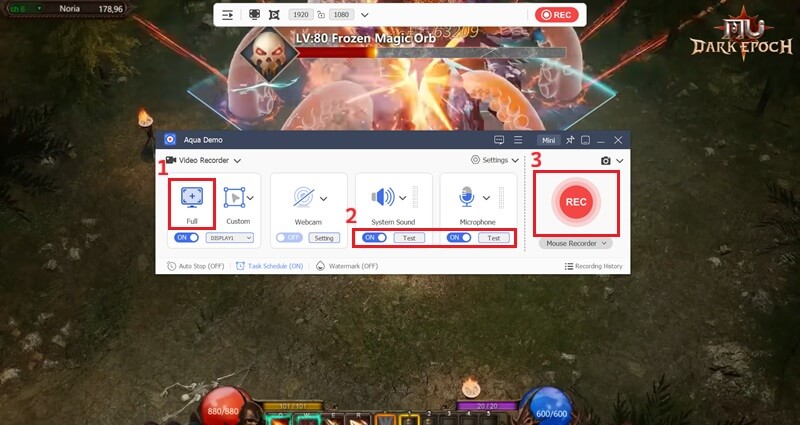
Step 4 Stop Recording and Save
Once you have finished capturing your gameplay, click the "Stop" button. Then, the preview window will appear. Here, you can play and review your recorded PS4 gameplay. You can also trim some of your highlights and save them for future editing or direct sharing.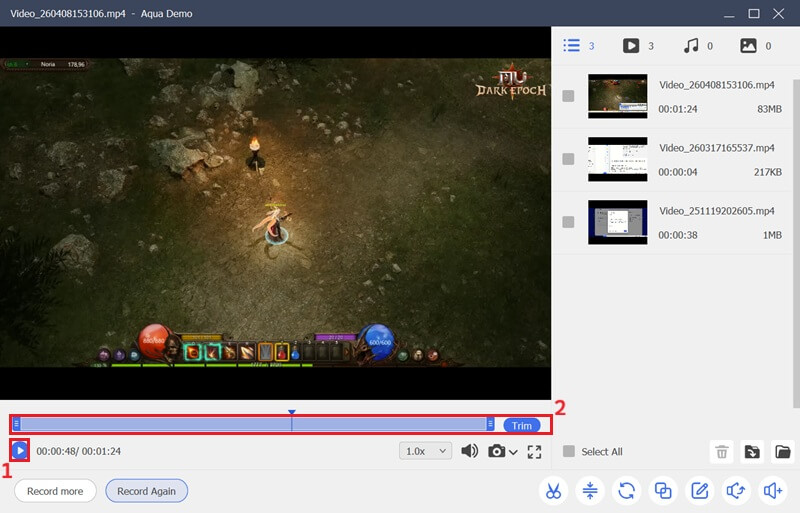
Frequently Asked Questions
Is gameplay recording enabled by default on PS4?
Yes, the PS4 can record your gameplay automatically using its built-in feature. It continuously saves the last few minutes of your game in the background. So, if something exciting happens, you can easily save the clip without starting a manual recording.

How long can the PS4 record gameplay?
By default, the PS4 can record up to 15 minutes of gameplay. However, you can change this setting in the system menu to a shorter or longer time. Keep in mind that longer recordings may take up more storage space on your console.
Can I record gameplay with better quality on PS4?
Yes, you can improve the recording quality by adjusting the settings. For example, you can increase the resolution or change the frame rate for smoother videos. However, if you want even better results, using a capture card and external software is a more advanced option.
Conclusion
Recording your gameplay on PS4 is simple once you know your options. You can start with the built-in recorder for quick and easy clips without extra tools. On the other hand, a capture card with screen recording software gives better quality and more control. Both methods work well, depending on your needs and setup. If you want the best way to record PS4 gameplay for YouTube, try both and see what fits your style. In the end, feel free to adjust settings and share your own tips with others.
| Methods | Overall Effectiveness | Recording Duration | Performance Impact |
|---|---|---|---|
| Built-in PS4 Recorder | Good for casual use | Limited (up to 60 minutes max) | May affect gameplay slightly |
| Capture Card with Screen Recorder | Best for professional or content creator | No strict limit (depends on storage) | No impact on console performance |