


Gameplay Recorder for YouTube Creators
This gameplay recorder for YouTube helps creators record gameplay videos with clear sound and stable video. Capture, edit, and prepare YouTube gaming videos without a complicated setup.
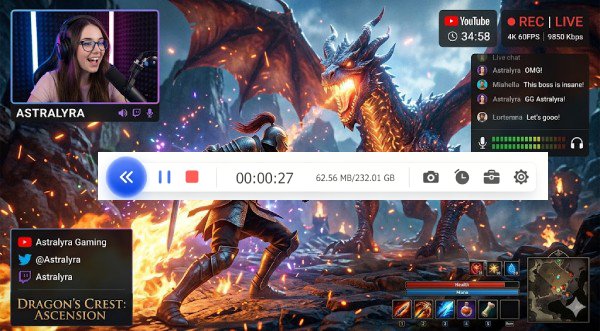


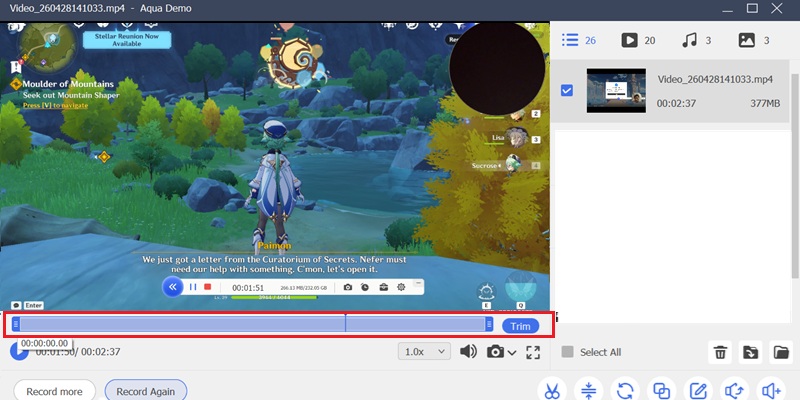
Start Recording Instantly
Configure your session and record with one click.
Popular Ways to Use YouTube Gameplay Recording
Capture smooth gameplay in high quality and easily share videos on YouTube.
How to Record Gameplay Videos for YouTube
Check the easy steps to record gameplay video for sharing on YouTube.
-
1
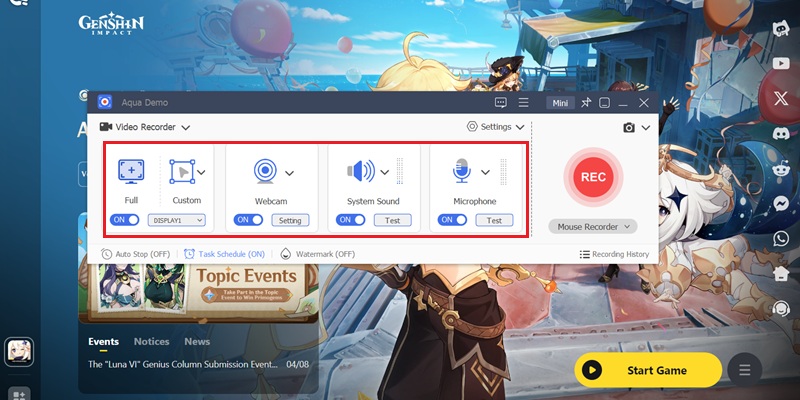
Define Game Capture Scope for Gameplay Footage
Select the active game window or full-screen mode to isolate in-game rendering from desktop elements. This ensures only gameplay visuals are recorded for clean YouTube-ready output.
-
2
Activate Audio Layers and Facecam Overlay
Enable system audio to capture in-game sound effects and dialogue with full clarity, then switch on webcam input for live reaction tracking. This layered setup enhances viewer engagement for gameplay content.
-
3
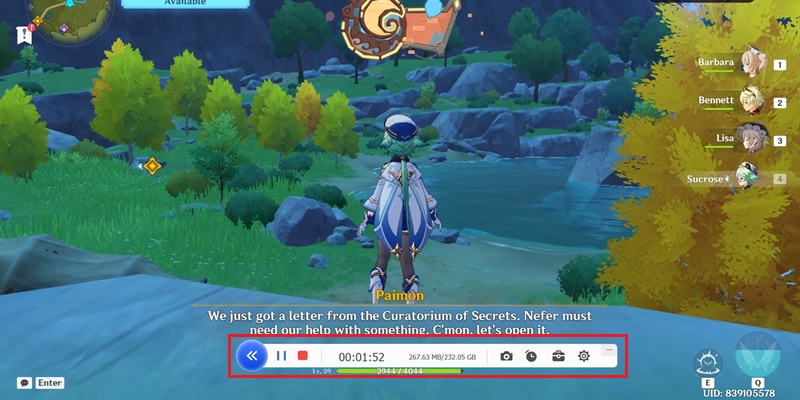
Initiate High-Fidelity Gameplay Recording
Start the recording session once gameplay begins to capture real-time actions with stable frame performance. This preserves smooth motion, combat sequences, and interactive moments for YouTube publishing.
-
4
Refine Recorded Gameplay for Publishing
Trim unnecessary segments and highlight key gameplay moments to improve pacing and viewer retention. This post-processing step prepares a cleaner, more engaging video for your YouTube channel.
Why Use a YouTube Gameplay Recorder
Create better gaming content for YouTube with tools designed for recording, editing, and publishing videos that help grow your channel.
4K Gameplay Capture for YouTube
Record gameplay in sharp 4K resolution with clear visual detail for polished YouTube videos. Keep every scene crisp and ready for walkthroughs, reviews, and long-form gaming content.
Smooth Recording Without FPS Drops
Capture gameplay smoothly without slowing down your game or interrupting performance. It helps maintain stable frame rates during longer sessions, resulting in cleaner, more consistent recordings.
Record Game Audio and Microphone Together
Capture in-game sound and your microphone simultaneously for commentary and live reactions. This makes it easier to create engaging gameplay videos without having to sync audio later.
YouTube-Ready Gameplay Workflow
Record full gameplay sessions and save them in MP4, MKV, MOV, and other formats, ready for fast uploads. It gives you a smoother way to turn gameplay into polished YouTube content with less extra work.
Streaming-Ready Gameplay Capture: 4K UHD Recording with Stable 60 FPS
Record YouTube Gameplay Content Without Frame Loss
AceThinker utilizes a GPU-Accelerated H.265/HEVC Encoding Engine to preserve fast-action sequences, particle effects, and HUD overlays in full 4K UHD resolution. Our visual comparison analysis confirms that high-speed gameplay transitions, interface elements, and texture details remain sharp during recording and playback. This ensures that YouTube gaming videos maintain creator-grade visual fidelity for streaming highlights, walkthroughs, and competitive gameplay uploads.
Technical Metrics
We validate gameplay recording performance using frame-stability analysis and hardware-level encoding benchmarks. Every capture session is optimized for low-latency recording and synchronized audiovisual playback for YouTube publishing workflows.
Comparison Chart
| Features | Basic Recorder | YouTube Creator Recorder |
|---|---|---|
| Video Quality | Standard recording quality | Optimized for YouTube in HD and 4K |
| Webcam Support | Limited or unavailable | Full facecam integration for reactions and commentary |
| Audio Recording | Basic sound capture | Voice commentary plus system audio recording |
| Export Options | Generic file formats | YouTube-ready formats for faster publishing |
| Best For | Casual gameplay recording | Content creators, streamers, and YouTubers |
| Start Recording | Get Pro Version |
Other Solutions You May Like
Start Recording YouTube Gameplay Instantly
Start recording gameplay for YouTube directly in your browser. No installation is required, making it simple for creators to create videos anytime.
Frequently Asked Questions
How do I record gameplay or tutorials with facecam and voice commentary for YouTube?expand_more
Why does my YouTube recording look blurry after upload or export?expand_more
What recording settings should I test before making a YouTube gameplay video?expand_more
How do I record only the game, browser, or software window instead of the whole desktop?expand_more
How can I capture system audio and microphone without missing either source?expand_more
Start Recording YouTube Gameplay Instantly
Record gameplay videos for YouTube with clear audio, smooth performance, and easy export for faster publishing to your channel.